
Using Git with TwinCAT 3
10 min read

Introduction
TwinCAT 3 is a powerful automation software platform developed by Beckhoff Automation. It is widely used in the field of industrial automation and control systems. This software is designed to facilitate the development, programming, and execution of control applications for various industries, including manufacturing, process control, and building automation.
Git is a widely used distributed version control system that offers efficient and collaborative software development. It enables developers to track changes, manage versions, and collaborate seamlessly on codebases. Git's distributed nature and branching capabilities make it a robust choice for both individual developers and large teams, promoting code stability and effective project management. Git is a free and open-source software.
In this tutorial, you will learn how to configure the Git in TwinCAT 3 environment. We will create our first commit and push it to the Git repository. We will compare changes made to the local repository with the remote repository.
Prerequisites
In order for you to follow this tutorial, you will need basic knowledge of the Version Control concepts and the following prerequisites:
Software
A running installation of TwinCAT 3 - eXtended Automation Engineering (XAE) “Used in tutorial Installation file”.
Installed Git and created repository (we will use GitHub as a host for remote repository)
TwinCAT 3 Version Control
In this tutorial, we will use GitHub as a place where we store our remote repositories.
Cloning Repository
In order to create the first commit we have to clone our repository to our system. We have to navigate to the repository online location and copy the clone url address.
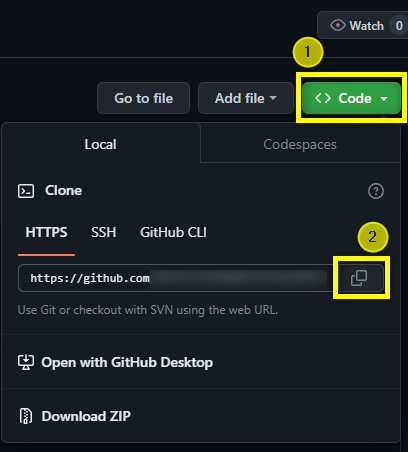
Cloning the repository can be done directly in the TcXaeShell environment. Open a new empty project, then go to “Team Explorer” in the left pane's bottom corner, click on Manage Connections on the top bar and choose clone. Paste the previously copied URL of a git repo and define the file's location. Then confirm with the Clone button, and the newly cloned repository will show up, then open it by double-clicking on it.

In our example, we had a project already developed that was not part of the git repository. To include it there we have copied in the Windows Explorer all of the files to the repository location.

In the "Team Explorer" we can view all of the files that have changed since the repository was cloned by selecting the Changes option. This includes all of the project files that we copied into the folder.

If this is your first time using the version control system in the TwinCAT 3 environment, you will be asked to enter some information so that you may be recognized later when you publish an updated project to the Remote repository of your choice (in our case GitHub).

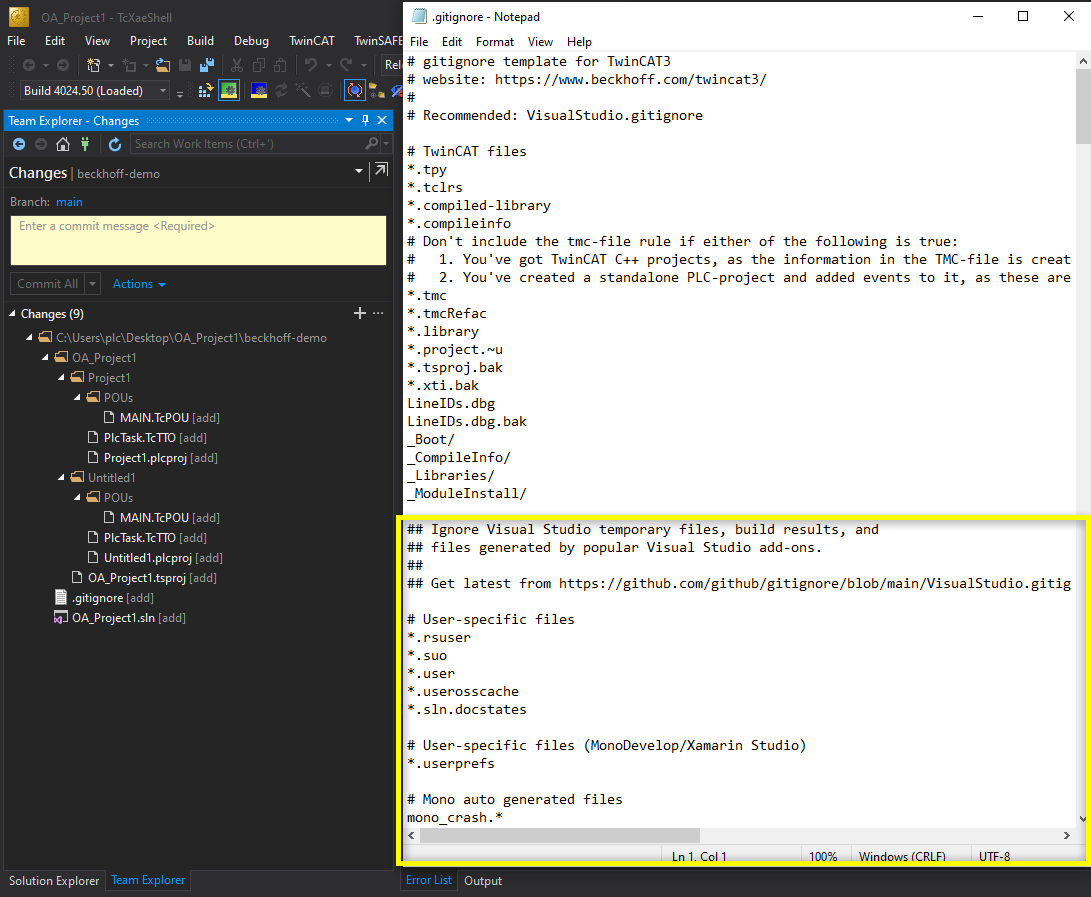
All of the files have a [add] bracket next to them, indicating that they are new in reference to cloned repository content. There are many files for which we are not required to track changes. We would like to monitor our program's source code. We have to create a .gitignore file and store it in the repository folder in order to accomplish this.
.gitignore
It is important to choose which files in version control are not required to have changes to be tracked. We need to set up the .gitignore file in order to accomplish this. Thanks to it, Git will be aware of the files to ignore. I have attached a sample template for configuring .gitignore for the TwinCAT 3 project. The complete list of extensions used for the TwinCAT 3 project is accessible here. The instructions for creating your .gitignore file are listed below.
1) You have to create a new text file with the following name in the project folder:
.gitignoreNote: The file name has a dot in front of it, and the ".txt" extension must be removed.
2) After that, you can paste the contents of the default template configuration that is referenced (or create your own ignored extension list) and save it.
3) If the file extension was not removed when the file was created, remove it now.

Then, when we return to the software, we will see that our list of changes has been significantly reduced.

There are still files visible here that are specific for the Visual Studio environment which is incorporated in the TwinCAT 3 environment and are not part of the plc project. This is the highlighted .suo file. In order to ignore it we can simply add another record to our .gitignore file. You may get a predefined template for Visual Studio here, just like we were able to accomplish for the TwinCAT 3 ignore extensions. It content only needs to be copied, then pasted at the end of our file.
First commit
To make our first commit and push changes to the remote repository, we have to stage the files that we would like to update. To do this we have to click the “+” button to add all of the files. It is possible to add only some of them based on our needs.

It means that although we have staged our changes, only our local computer has access to them. The commit message must be typed in before pressing the Commit Staged button.

Next, we will be prompted that our commit has been created locally, and to push it to the remote repository we have to sync our changes.
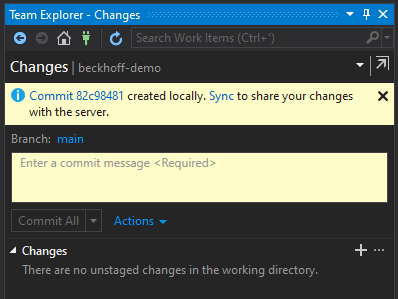
To push it to the remote repository we have to go back to the home screen, click on the Sync option then select Push and we should be prompted with the result.

After performing those operations our local repository has been pushed to the remote repository on the GitHub.

To summarize first we have added the project to our repository folder and created a .gitignore file. Then we staged our changes, committed this to our local repository and finally pushed changes to the remote repository, which is illustrated by the diagram below.
Viewing differences
I updated the code in my current project, so now when we return to the Changes option and choose "Compare with Unmodified" from the context menu, the window shown below will appear.

We have compared XML files between the commit that is currently in the folder and what is already in the software. The TwinCAT 3 built-in comparator can also be used to see those changes, but before we must configure it. We have to first launch the TwinCAT Project Compare.

The compare User Tool that we want to use must be configured in the following step.

Further, we will be prompted with the Configuration with the Usertool where we have to select GIT.

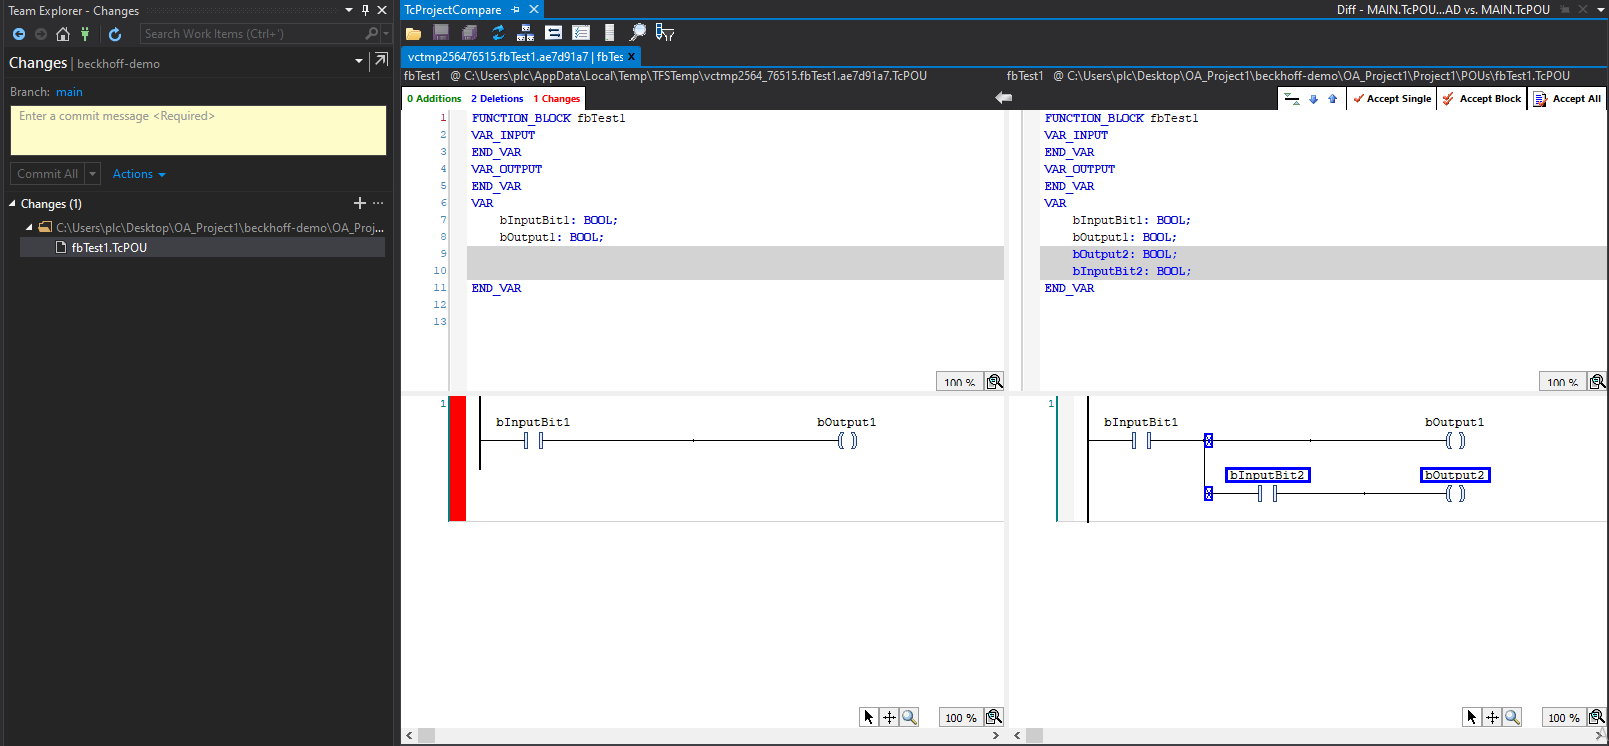
Lastly, when we try to compare our program again we will have the following screen.

This way allows us to compare code in the different programming languages like Ladder Diagram. A detailed explanation of the Compare Tool configuration is available at the Beckhoff site.
Conclusion
We saw how to configure the TwinCAT 3 programming environment to be able to integrate code with the Git repository. Our first commit has been created and pushed to the remote repository. It simplifies project management by enabling the tracking of changes, facilitating code reviews, and promoting better code quality. It enhances collaboration among team members by providing version control, ensuring that everyone works on the latest code, and minimizing conflicts.
Finally, if you have any questions or need assistance with an application and Industry 4.0 automation technologies, Outlier Automation has that know-how. Get in touch with us today to learn more about how we can take your business to the next level of Industrial automation.