
Tutorial: Securing OPCUA - Siemens S7-1500 and Ignition SCADA

Introduction
OPC UA (Open Platform Communications Unified Architecture) is a machine-to-machine communication protocol used for industrial automation. It provides a standardized way for devices to exchange data and services, regardless of their manufacturer or platform.
OPC UA is based on the publish/subscribe model, which means that devices can publish data and services that other devices can subscribe to.
TLS (Transport Layer Security) is a cryptographic protocol that is used to secure communications between two devices. It encrypts data so that it can only be read by the intended recipient. TLS is often used to secure web traffic, but it can also be used for most TCP/IP-based communication protocols, such as OPC UA. When OPC UA and TLS are used together, they provide a secure and reliable way for devices to exchange data.
TLS ensures that the data is encrypted and cannot be read by unauthorized parties, while OPC UA provides a standardized way for devices to communicate with each other. OPC UA and TLS are essential for ensuring the security of industrial automation systems. They protect data from unauthorized access and ensure that devices can communicate with each other reliably.
In this tutorial, you will learn how to generate a CA certificate for an OPC UA server, running on TIA Portal V18. We will connect securely over TLS to an OPC Client running in Ignition Gateway with Trusted Certificates and User Management between the server and client.
Prerequisites
In order for you to follow this tutorial, you will need the following prerequisites:
Software
A running installation of TIA Portal V18
An Opened TIA Portal Project with Certificate Manager and project security enabled. More information on this can be found in “Siemens-Using Certificates with TIA Portal”
Ignition Installed and Running on a Computer. For more information on Installing and Running Ignition Gateway view “Ignition Quick Start Guide”
Hardware
PLC S7 1500 series connected to a local network and the TIA Portal environment. S7 1200 PLC with firmware V4.4 or greater can also be used.
Computer or virtual machine running Ignition gateway and connected to the same network as the PLC.
Note that the same computer can run Ignition Gateway and the TIA Portal Project. However, if different computers are used, this tutorial still applies as long as all the equipment accessible through the network.
Tutorial Overview
Since we are trying to achieve a secure connection between an OPC UA Server and Client, the tutorial has been segmented into two main parts: Server Communication Setup and Client Communication Setup, both of which have a similar structure and steps. The list of general steps for both sections is outlined below:
Server Communication Overview
Create and Set a CA Certificate
Enable OPC UA Server capacity
Create OPC UA Server Device Settings and Security Configuration
Create User and Password for OPC Client
Create OPC UA Server Instance with data for OPC
Export Server Certificate to Install on OPC Client PC
Load Configuration into PLC OPC Server
Client Communication Overview
Install Server Certificate and files on Client PC
Create OPC Client Configuration
Add and Trust Server Certificates in Client
Export Client Certificate to Install on Server
Add and Trust Certificate In Server
Connect Client to OPC Server
Browse and add Server Data Block to Client
Test two way communication between client and server
OPC UA Server Setup
Create and aet CA Certificate in a running TIA Portal project with “Use global security settings for certificate manager” and Project Security Enabled (see prerequisites). TIA Portal automatically creates a CA certificate. To verify this on TIA Portal under Project Tree>Devices>Security settings>Security features double click on the Certificate Manager to open the existing certificates.

Certificate manager location
Under the Certificate Authority (CA) list, verify the current project certificate. Expand the columns and verify that any of your current certificates has the following settings: Used as: Certification Authority, Signature Algorithm: RSA-SHA254, Key Length: 2048 Bit. If you have no certificates, or none of them show the settings above. Right click on the list in an empty row and select Create.

CA certificate creation
Create a CA certificate
Settings:
Usage: CA, Self signed, Encryption method: RSA, Key Length:2048, Hash algorithm: sha256. You can decide any valid period that you consider for the certificate or leave as default generated for this tutorial.

CA Certificate Settings
Enable OPCUA Server
On TIA Portal under the Project Tree>CPU >Device Configuration, double click on to open the PLC configuration window. Highlight the CPU and right click and select “Properties”. In the General tab menu, look for the OPC UA and click on it to open the settings.

OPC UA Settings Location
On the OPC UA menu, look for the Server option and click to select it. This will open the OPC UA Server options. In there, activate the checkbox Activate OPC UA Server, this will enable the OPC Server. Also under Server Addresses, take note of the link and IP address of the OPC Server. This will be needed in the Client Settings to connect to the Server.

OPC UA server activation
OPCUA Server Certificate and Security Configuration
Proceed to the Security option under the OPC UA Menu. Check: ”Basic256Sha256- Sign & Encrypt” under the Server Security Policies. They are a few other policies selected by default under the server. Make sure to uncheck all of them except the policy option indicated before. This will ensure the highest level of security for the Server.
Under Certificate Settings, make sure to select the “Use certificates configured and downloaded using TIA Portal”. This allows us to create a new Device Certificate that can be linked to our CA Certificate previously created.

Server security Policy
Under the Server Certificate Section, TIA Portal will display a Server certificate. Server Certificates get created automatically when enabling the OPC UA. In the Server Certificate, click under the 3 dots “...” to display a list of device certificates available. Click on “Add new” to create a new Certificate.

Add new Server Certificate
Create a new certificate with the following options: “Usage: OpcUA server, Signed by certification authority”. Click on “Select” to display a CA Certificate List and verify that you have selected the correct CA certificate (Note: this is where we want to select our previously created CA certificate). “Encryption Method: RSA, Key length: 2048, Hash algorithm: sha256”, like before, the validity can be as default created or adjusted to specific needs.

Server certificate settings
Enable Server User Authentication and Create User and Password for OPC Client
In the OPC UA options under the User authentication section: Uncheck guest authentication, to prevent server anonymous login and check “Enable username and password authentication”.
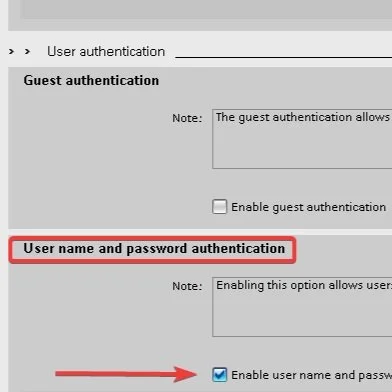
Enabling user authentication
In the User management section a list will be displayed with all available users. To create a new user, double click on an empty row, and a new user will be created. Modify the ‘Name’ and ‘Password’ fields according to your needs. Note: It is important that you follow TIA Portal password requirements; a non compliant password will prevent OPC communication.

User authentication password requirements
Server Runtime License
In the Properties>General menu, look for the Runtime Licenses selection. Click on it and look for the OPC UA>Runtime licenses click on the ‘drop down menu’ and make sure to match the Type of required license and Type of purchased license selection. To make sure, you have the correct runtime license before downloading to the PLC. Purchase a license from your Siemens distributor for the correct usage of the PLC runtime.
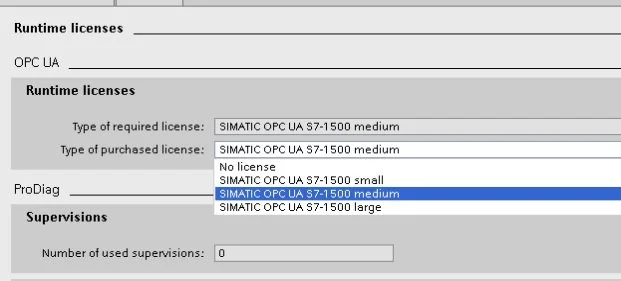
Runtime license settings
Data Block and OPCUA Server Instance Creation
In the Project tree under the “CPU” folder, expand the Program blocks folder and double click on “Add new block”. We are going to create a data block with different data types to send over OPC communication. The data types and number of variables shown here are just used for demonstration purposes. Data types and number of variables will depend on application requirements and data desired to transfer over OPC.
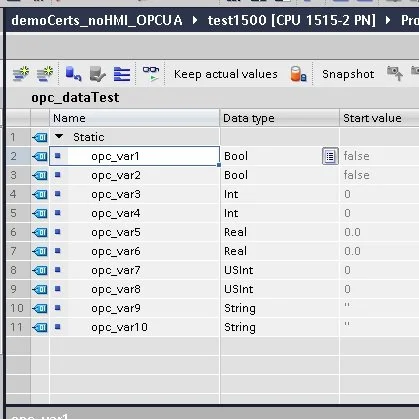
Example of data block for testing
Then, we need to add this data block to an OPC Server Interface that we need to create. In the Project Tree, look for the OPC UA communication folder. Expand the folder and double-click on Server Interfaces > Add new server interface. To create a new Server Interface, name it and create the interface. On the right side of the interface menu, you will find a section called OPC UA elements. Browse in the folder list for the Data Block you created. This will display all the tags in the data block. Now, to bind the tag into the OPC interface, simply drag and drop the tags you want to share via OPC.
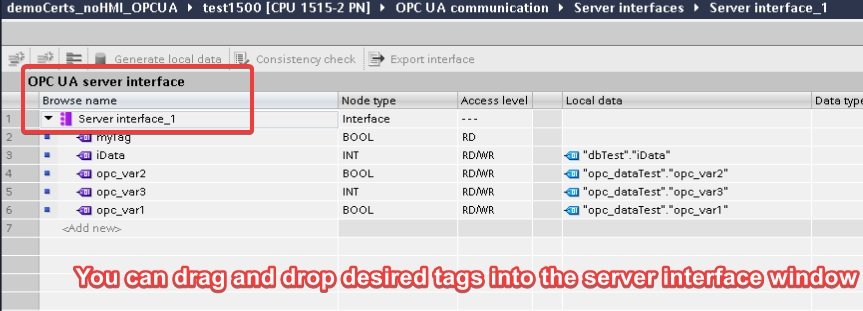
Server interface example
Tags in the data block can be dragged and dropped into the OPC UA server interface window. The entire data block can be dragged and drop if desired. This interface option is not required. All tags in the PLC can be made externally available on the server by selecting “Enable standard SIMATIC server interface”; if this is de-selected, then the externally accessible tags must be defined as shown above.

Enable standard SIMATIC server interface
Download Configuration
Save your project and proceed to download into the PLC. Look for your device under the Project Tree and right click on the device, select Download to device>Hardware and software (only changes).
Export Certificates for client OPC UA
Finally, we have to export the server certificates files needed on the computer intended for running our OPC Client (Ignition). Navigate or Open the certificate manager as previously mentioned. In the Certificate Authority list, right click on the CA previously created, and select Export.
Note: Alternatively, you can import the Device certificate of the OPC UA server following the same process. By Importing the CA certificate, all device certificates of the clients that were signed via this certification authority would be classified as trustworthy from now on.
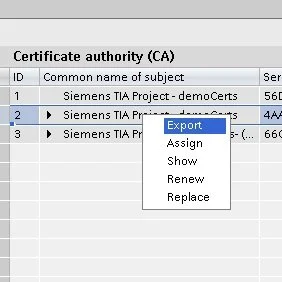
CA certificate export
The export will open a file explorer window where you can select the location you want to save the exported certificate. Take a note of this location so you can easily access it and import the certificate in the client in the upcoming part. TIA Portal can export the certificate in different file types. For the connection we are doing, we need the (.der) Der coded (unencrypted) file.
Note: If during the export the system prompts with another window and you see a export private key with certificate option, this option is not necessary as the client will authenticate using the user management system we previously created.

Certificate der coded file export
OPC UA Ignition Connection
Installing Certificates in Ignition Gateway PC
Open the location that contains the .der file exported from the server previously on the computer that will run the OPC client (in this tutorial, this would be the PC running the Ignition Gateway, see prerequisites). Locate the .der file and double-click on it. This will open a window that will give you the option to install the certificate. Click on it and select to install it in the local machine. On the installation wizard, select the option Place all certificates in the following store. Click on Browse and select the Trusted Root Certification Authorities for the installation.
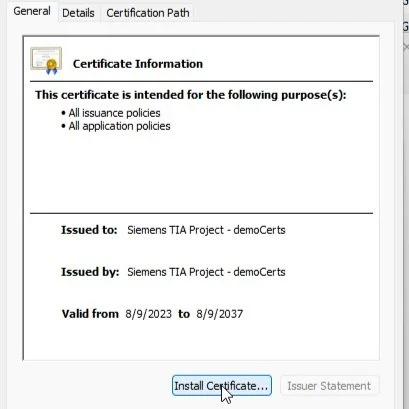
Installing server certificate

Installing certificate in root directory
Creating New OPC connection
Sign in into your Ignition Gateway web-browser, once you confirm your gateway is up and running. On the side navigation select the Config option, scroll down and click on the OPC Client > OPC connections.

Ignition create OPC connection
In the new window, select the option Create new OPC Connection > OPC UA

Ignition creating new OPC UA connection
In the Endpoint URL section, type or copy and paste the server address that we saw earlier when creating the OPC connection for the server. Type it down exactly as it is shown in TIA Portal.
Make sure to include the “:4840” or any number after the “:”, as it is indicating the port number used by the server for the OPC communication.

Server Endpoint URL
OPC UA Client Connection Settings
If the Endpoint URL and Network Connection between Server and Client is correct, Ignition will discover the server and prepopulate the server name. Follow through this basic configuration. Make sure you select the following settings for the Endpoint Security “Mode: Sign and Encrypt, Security Policy: Basic256sha256” (matching the settings previously selected on TIA Portal). Click on Finish.

Ignition client security settings
OPC Client Authentication Settings
When you click “Finish” in Ignition, the OPC client will try to connect to the server. This connection will fail. This is not a concern, as we still need to set up the client authentication and trust the server certificates on the client and server. In Ignition, click Edit for the faulted connection. This will take you to a new window. Look for the Authentication section and enter a valid “username” and “password” for the client.

Client user authentication
Note: After Password has been set, click on the checkbox “Show Advanced Properties”. Look for the section Security in this section there is a checkbox for Certificate Validation Enabled, if needed for troubleshooting, you can uncheck this option. This will allow Server and Client to ignore the trusted certificate and communicate. Beware that Disabling certificate validation compromises the security of this connection and should just be used for testing purposes of a connection.
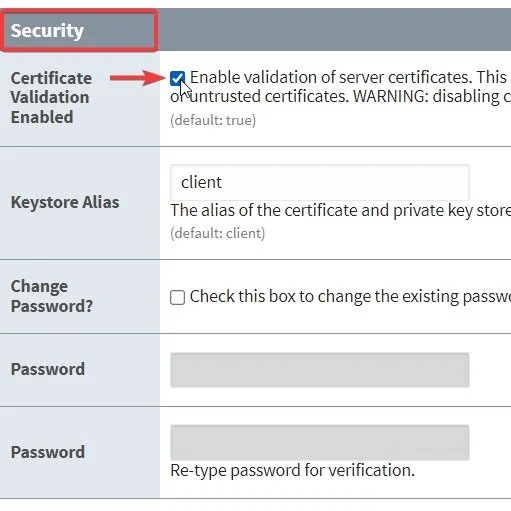
Certificate validation
OPC Client Certificate Installation
Since our goal is to have a secure and trusted connection, we need to trust the certificate on the Client and Server. Go to Ignition's Config Navigation and look for the section OPC UA>Security and click on this section.

OPC UA Ignition Security
In this new window you can set up the Client security Trusted Certificates. Look for the “Upload Trusted Certificate”. This section will show a button for Browse or drag files. Drag the server (.der) file into this location so Ignition can trust this certificate.

Trusted certificates upload
NOTE: If on the previous connection attempt, Ignition shows a certificate in the “Quarantined Certificates” section after adding and trusting the Server certificate, click “Trust” to unquarantine the certificate if necessary and refresh the page.

Quarantined certificates
OPC Client Certificate export to OPC UA server
Now, we just need to add the certificate of the OPC Client to the Server, and our OPC communication will be fully trusted and secured. In the same window where we previously uploaded the server certificate, at the top, there should be a navigation tab called “Certificates”. This is where Ignition Gateway stores the gateway's own certificates. Click on this tab, and a new window will display a list of your own certificates.
Under the Client Certificate Section, click on Download. This will download the OPC Client Certificate. Move the downloaded file to a significant location on the computer running the TIA Portal Project.

OPC client certificate download
Back in TIA Portal, on the OPC Server project, open the Certificate Manager and click on the Trusted certificates and root tab.
In this list, right click on an empty row and select the option Import . This will open a window, so you can browse and add the Ignition Client Certificate we downloaded previously.

Import client certificate
Once the certificate is imported, TIA Portal will show you the new added and trusted certificate in the list. After this is done, proceed to the PLC Device Properties, where we set up all the previous OPC UA configuration. Go to the OPC UA>Server>Security>Certificates. In that window, find the section called Trusted Clients. This will display a list of all the trusted client certificates on the server. In an empty row , double-click on the <Add new> button. This will open a pop up, where you can select the Ignition OPC UA Client certificate we just exported.

OPC trusted clients certificates
Save the TIA Project and load the configuration into the PLC, so it can transfer the certificate and changes we just added. After this is done and the server is running, the connection between the server and client should be fully operational.
Testing Connection
In the Ignition Gateway Web Browser, refresh the page and go to the Status>OPC Connections Page.
In this page, Ignition will display the current OPC connections, and the Uptime of the connection. Look for the OPC connection we created to the server (default name should be something like SIMATIC.S7-1500.OPC-UA, unless the user defined a custom name) and look for the Status indication. If successful it will show CONNECTED, indicating that we have working connection between OPC Server and Ignition Client.

OPC connection status
Conclusion
We saw how to implement the principal steps to establish this connection between TIA Portal and Ignition Platforms. One thing to notice is that different platforms will require similar steps. And in particular, the setup for TIA Portal Server should remain the same when used as an OPC Server.
OPC UA is a powerful open standard that enables secure, reliable, and efficient data exchange. It is well-positioned to play a key role in Industry 4.0 as one of the principal standards. OPC UA is scalable and flexible. This makes it a good choice for a wide range of Industry 4.0 applications, from small-scale production lines to large-scale manufacturing plants.
Here are some additional benefits of using OPC UA and TLS together:
Improved security: TLS encryption protects data from unauthorized access.
Increased reliability: OPC UA provides a standardized way for devices to communicate with each other, which reduces the risk of errors.
Reduced complexity: OPC UA and TLS are both well-established protocols, so there is no need to develop custom security solutions.
Cost-effectiveness: OPC UA and TLS are both relatively inexpensive to implement.
If you are looking for a secure and reliable way to communicate with industrial automation devices, then OPC UA and TLS are a good choice. They provide a proven solution that can help you protect your data and improve the reliability of your systems.
If you are interested in finding out more about other industrial protocols and technologies used in Industry 4.0, check out our article “What’s the Difference Between OPC UA and MQTT” to learn a little more about OPC UA.
Finally, if you have any questions or need assistance with an application and Industry 4.0 automation technologies, Outlier Automation has that know-how. Get in touch with us today to learn more about how we can take your business to the next level of Industrial automation.